Last updated on December 20th, 2025 at 02:46 pm
Ok, be sincere with me, the first time, I attempted to organize roles on my Discord server, this failed miserably, everything got messed up. Members were unable to chat, my bot was not responding to work, and I had to spend two hours Googling why the channels I had just created did not show up to anybody.
And so, here is what I learned once the roles were created on my own (without making the same mistakes). You understand how to add the roles and assign them on Discord, but do not want to lose your mind, then I have you.
Table of Contents
Why Roles Actually Matter
The thing is, before leaping down there, roles are not mere fancy colored names. They are the means of control in your server on who is allowed to do what. Consider them permission packages one role may allow oneself to block trolls, another only allows oneself to talk in certain channels.
I manage a small gaming server of approximately 80 people and roles allow me to manage things without managing each human being on it.
How to make your first role (and not mess it up).
The following is how I established roles:
Step 1: Click Server Settings on a name at the top left of the right above the server.
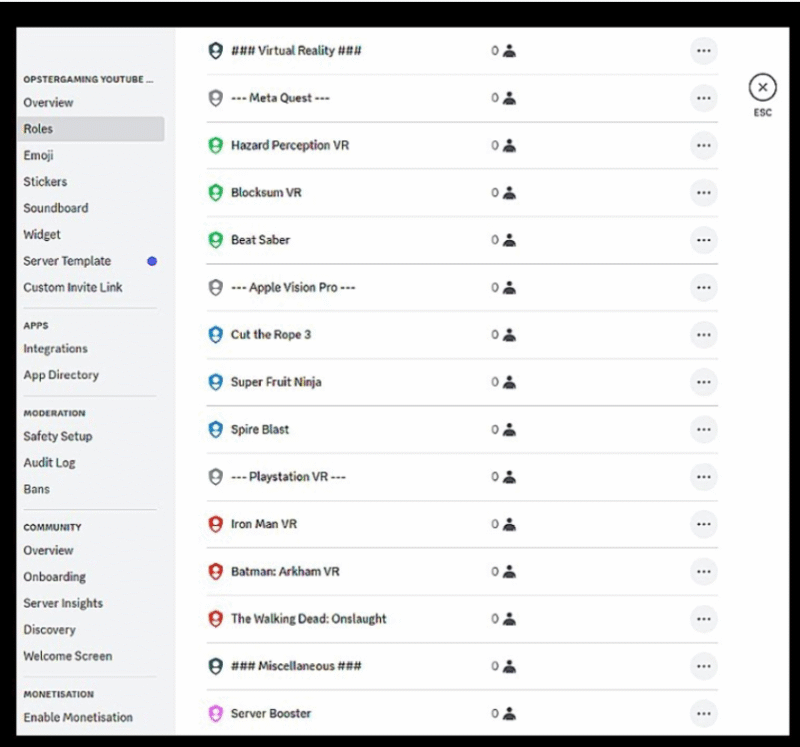
Step 2: Use the sidebar to recruit roles. You’ll find their base position is occupied by everybody– that is what you all have as you join the club.
Step 3: Click Create Role. I normally begin with something easy as “Member” or regular.
Step 4: Naming It, you are given an option of picking a color (it appears beside their user profile in the chat) and here is where the interesting part comes in.
The settings that baffled me in Permission to Permission.
In role editor, there are two tabs Display and Permissions.
On display, I enable a display role member independent of the online member, and particularly in matters related to such important roles as that of Moderators. It generates graphics in your list of members.
Look under Permissions, do not simply switch it all on. I made that mistake. Rather, reflect what this position really requires. To be a basic Member, I tend to enable:
- Send Messages
- Embed Links
- Attach Files
- Add Reactions
- Use External Emojis
That’s it. You do not have to give everybody the option of giving them Manage Messages or Mentioning everybody – you can believe me on this one.
It is the Hierarchy Thing that No One Usually Clarifies.
This is what caused me a fall: position in a role is more than allowances.
Resort your roles up and down in the list. Higher = more power. Then as long as your Moderator position is lower associated with your Member position, then your mods will not be able to control members. This may seem like common sense, but I was troubled an hour by this very problem.
My hierarchy seems to be the following (top bottom):
- Admin
- Moderator
- Bot (yes, bots need roles too)
- Member
- @everyone
Discord permissions system operates in levels, and it is better to stay within this order not to have headaches in the future.
In Reality, Designating Roles to Individuals.
Two ways to do this:
Method 1 (Manual): Right-Click a person name – Roles -Click the box associated with the role you desire him/her to have.
Method 2 (Bulk): – Go to Server Settings – Roles – click the role – Members tab – add people there.
I apply Method 1 whenever I have short-term assignments and Method 2 whenever I have several people to establish at the same time.
When Things Don’t Work (And How I Fixed Them).
Issue: My bot was not able to give new members roles.
Solution: The bot was not high ranking enough in the hierarchy. I shifted it over the positions that it had to occupy and bang, fixed. Bots are not able to offer roles more superior than they occupy. This is the most widespread problem that people encounter.
Circumstance: This was a case whereby a person had a role yet was unable to send messages in a channel.
Fix: Solution has channel specific permissions which override the role permissions. I clicked on the settings of that channel – Permissions – shifted their role – clicked the red X before the setting Send Messages to a green checkmark.
Establishing Role Based Channels.
This is the place where positions become potent. I added a new category with the title “Staff Only” and:
- Clicked with a right button the category – Edit Category – Permissions.
- Blocked all people to access the channel.
- Only my Admin and Moderator roles were allowed.
Any channel I design within that or category inherits respectively such permissions by default. Much easier than installing it by channel.
Normal-Mode Onboarding (Game Changer)
It will soon be tiresome to allocate the roles of every new member manually. I have MEE6 to automatically assign a role of a Member when an individual verifies. It is possible to also create reaction roles where individuals can assign themselves interest-related roles (such as PC Gamer or Console Player) by clicking emojis.
It was also able to save me hours of manual work, including the time of setting up it took me 10 minutes.
What I Wish I’d Known Earlier
Start with fewer roles. I have first drawn up 15 various roles and it had turned into a nightmare to handle. I have now been subscribing to 5-6 core roles and would only contribute more when necessary.
Administrator permission does not come easily. It avoids any restrictions by channel and provides the absolute control. But I have it upon my own responsibility.
Test with an alt account. Log out first with an account with the rank of your new setup and then use the second account that has the role and test everything as expected.
The Bottom Line
There is no problem with setting roles in Discord when you are aware of hierarchy and permissions. Establish roles intelligently, place them appropriately and leverage channel specific permissions in cases where you require fine-tuning.
My server currently performs well since I ensured that I set this up properly. A server to serve 50 people does not have the same complexity as a 5,000-person community will have, give it very simple and then only add the complex only after you prove that you require it.
And if something breaks? This hierarchy is likely to be inappropriate. Check that first.
Also Read Steal a Brainrot Codes: The Gaming Phenomenon That’s Breaking the Internet
I’m a technology writer with a passion for AI and digital marketing. I create engaging and useful content that bridges the gap between complex technology concepts and digital technologies. My writing makes the process easy and curious. and encourage participation I continue to research innovation and technology. Let’s connect and talk technology!