
Last updated on December 19th, 2025 at 01:59 pm
I gotta tell ya, I’ve been hearing the same complaint from entirely too many people: Windows 11 is just…well, it’s sluggish. The fan is screaming like it’s about to launch an app, then freezes mid-click and Task Manager spits up a CPU sitting at 80-100% with no obvious cause.
I’ve been poking around this problem for weeks, testing various fixes and reading up on what’s out there that works. Here’s what I found.
Table of Contents
Why Your Computer’s Central Processing Unit Is Going Crazy
But rather than racing headlong into solutions, let’s consider what actually led to this mess. Windows 11 high CPU usage isn’t a mystery there are culprits, and they’re specific.
As I flipped through dozens of cases, patterns began to emerge. Background apps you didn’t even realize you had are running amok. Windows Update loves to download shit in the background whether you asked it to or not. Start up programs start running the moment you boot up, sucking down resources before you even open Chrome.
Then there’s the sneaky stuff, services such as SysMain (formerly known as Superfetch) and Runtime Broker. These are advertised to help your system run more smoothly, but they often have the opposite effect. Plus, outdated drivers and unnecessary visual effects are sapping performance.
Here is a rapid look at the most common causes, and what you can do about them:
| Common Cause | Quick Solution |
|---|---|
| Background apps eating resources | End tasks via Task Manager |
| Too many startup programs | Disable unnecessary ones in Settings |
| SysMain service running wild | Stop and disable the service |
| Windows Update downloading in background | Pause updates temporarily |
| Heavy visual effects | Switch to “best performance” mode |
| Outdated drivers | Update via Device Manager |
| Runtime Broker using too much CPU | Disable Windows tips and suggestions |
The Fixes That Actually Work
Start With the Obvious
I realize it sounds too obvious, but reboot your PC first. Seriously. It removes temporary bugs and allows you to start a new day with your system fresh. If the issue returns immediately after a reboot, you have something more fundamental at work here.
Then type task and open Task Manager (Ctrl + Shift + Esc) to sort by CPU usage. Anything above 50-70% when you are inactive should be a red flag. Right-click on the offender and select “End task.” This isn’t a solution to the problem but at least it will help you identify what’s hogging resources.
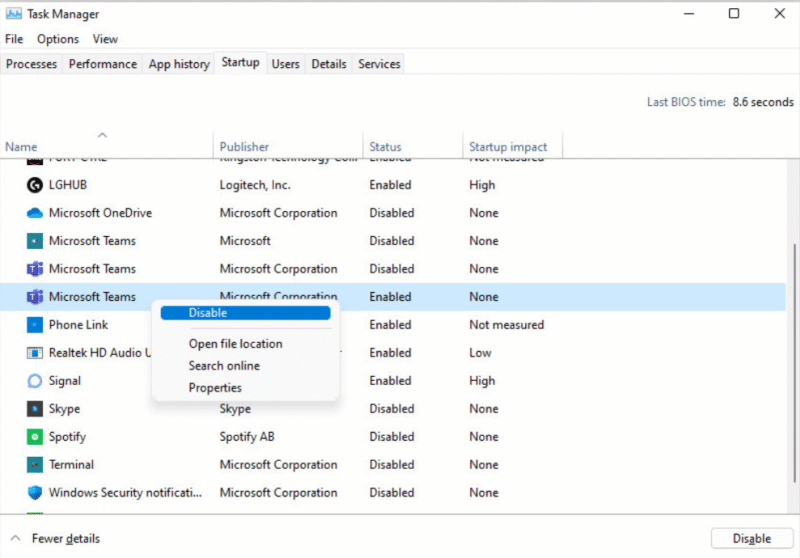
Kill the Startup Bloat
This one made a very big difference when I tried it out. Go to Settings > Apps > Startup Apps and see what’s launching on its own. Random Spotify, Microsoft Teams updaters: All demand to start with Windows.
Turn off everything you don’t need to use as quickly as possible. Your PC will boot up faster and you’ll have a lot more headroom for real work as well.
Tame SysMain
SysMain should preload apps so that they can open faster. In reality? It’s just CPU burning for no damn reason.
Here’s how to shut it down:
- Type services in the Run dialog box, then press Enter. msc, and hit Enter
- Scroll down to “SysMain”, and double-click it.
- Set Startup Type to “Disabled”
- Click stop if its running, then apply OK
- Restart your PC
I have observed this lone change reduce the CPU load by 20 to 30% on machines that were suffering.
Give Windows Update a Break
Windows Update is aggressive. It downloads patches, it scans for new updates and it installs stuff in the background while you’re working on something else.
Stopgap: Click to Settings > Windows Update and click “Pause for 1 week.” This gets you some breathing room without fully disabling security updates.
If you’d prefer more control, go to Services (same way as before), and stop “Windows Update,” then set it to “Disabled.” But remember to turn it back on someday when security patches are released.
Dial Down the Eye Candy
The animations and the transparent effects on Windows 11 look amazing. But if your system is on the older (or middle) side those visuals come at a performance cost.
Look for “SystemPropertiesAdvanced” in the Start Menu, click on Settings under Performance and then choose “Adjust for best performance.” This removes all the fancy items but does make everything snappier.
If you want a compromise, choose “Custom” and uncheck things like: “Animate windows when minimizing” and “Fade or slide menus into view.”
Update Your Drivers
Outdated drivers are more than just an inconvenience. Windows 11 requires current drivers for your GPU, chipset and network adapters to function properly.
Open Device Manager, click Action > Scan for hardware changes, and then click any device with a warning icon and select “Update driver.” For important things like your graphics card, just visit the website of the manufacturer (NVIDIA, AMD, Intel) and grab the latest download.
Deal With Runtime Broker
The Runtime Broker is responsible for managing permissions for Windows Store apps, and can get out of control causing it to use up to 30–40% of your processor.
Quick fix: Head to Settings > System > Notifications & Actions and turn off “Get tips, tricks, and suggestions as you use Windows.” Also turn off any “Show recommended content” toggles you can find. Reboot, and Runtime Broker will cool his jets.
When Nothing Works
If you’ve done all this and the CPU is still crazy, then gaming malware / a bad system file may be at your door step. Run a full Windows Defender scan, and treat your system to a second opinion from Malwarebytes.
Bother to Safe Moede and check if it still happens. If the CPU usage is normal in Safe Mode, something on your PC is serving as the offender. Begin uninstalling lately installed app or Clean Boot to find the culprit.
Last resort? A clean Windows installation. Copy your files, throw a USB pad drive in your pocket and reinstall Windows 11 from scratch. It’s irritating, but it seems to work when nothing else does.
What I Learned
High CPU usage on Windows 11 is not some mystery bug that you simply have to accept. Usually, it’s solvable in 15-20 minutes of adjustments.
My biggest gains were disabling SysMain, trimming startup apps and turning off visual effects. Just those three things alone can turn a sluggish system into something actually usable.
And the thing is, Windows 11 really does have better memory management and faster boot times than Windows 10 when you fine-tune it. You simply need to look past the on-by-default settings that assume you’re using a minty fresh gaming rig.
Give these fixes a shot. Your CPU (and your sanity) will appreciate it.
Also Read: How to Send Stickers in iMessage on iPhone!
Passionate content writer with 4 years of experience specializing in entertainment, gadgets, gaming, and technology. I thrive on crafting engaging narratives that captivate audiences and drive results. With a keen eye for trends and a knack for storytelling, I bring fresh perspectives to every project. From reviews and features to SEO-optimized articles, I deliver high-quality content that resonates with diverse audiences.